
Go!Vid is a fully automated video onboarding using voice recognition, voice synthesis, IP localization and video recording. It is based on a customizable scenario to enable the user experience to be as frictionless as possible. It also allows our clients to provide to the regulated institutions all the necessary checks that need to be applied to assess the quality and integrity of their own customers.
Before launching the onboarding session, our client’s customer needs to provide some preliminary information (first name, last name, birth date, email and phone number) for further verification during the session. Any scenario then contains a list of questions (depending on the client requirements) of the following kind:
Identity verification: an identity document needs to be scanned and will be analyzed via authenticity controls and will return a score
Face match: if available, the identity document face will be compared to the video onboarding face and scored. Additional controls are done to detect abnormal face emotions or person of interest (PEP, SIP, …).
Data verification and information request: the answer will be compared to known information or to pre-defined list of accepted answers.
Document upload: a document (proof of address for example) needs to be uploaded from our client’s customer device or a picture of the document needs to be taken using the camera.
Antibot verification: our client’s customer needs to read numbers that appear on the screen, to make sure he/she is not a robot.
At the end of each onboarding session, a final score is defined using the question results and customizable coefficients.
The onboarding sessions are currently available in 16 languages but can easily be translated to any other languages upon request.
The onboarding sessions are generated by Rest API, the session frame itself can then be integrated anywhere. At the end of the session, the user is redirected to a customizable link to be defined by our client. Session ID is attached to the redirection link and can be used to get detailed information about the session.
The Go!Vid frame is fully web based and responsive. It can be attached to a mobile app or a desktop website for instance. Only camera and audio accesses need to be enabled. Texts and colors can be customized to match our client’s brand and onboarding process.
Description and definitions
As mentionned above, each finished session is given a score that is computed depending on the scenario configuration.
Go!Vid also provides a set of features to review sessions and define their status using labels. These labels can be automatically or manually set.
In the following document the merchant will be the integrator of the solution.
Session labels
How it works
Any scenario is configured with:
a list of available labels to set once a session ends. Each of these labels can be used by Go!Vid automatically at the end of a session or only manually.
a session score threshold to determine if the session state is negative, positive or neutral.
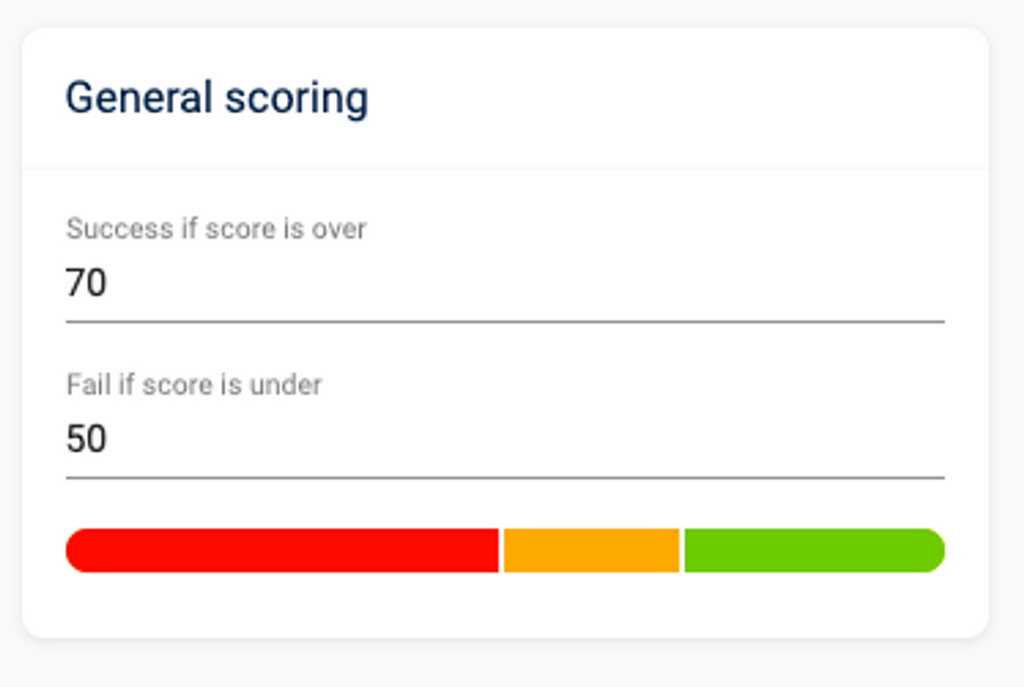
Once the score of the session is computed (see next section about “scoring sessions”) we use the session score threshold configuration to decide if the session state is negative (red), positive (green) or neutral (orange).
Then we look at the available labels and automatically add the corresponding label to the session only if this label can be automatically set by Go!Vid. If no such label exists, no label is set to this session.
A session label can be changed anytime in the future by an authorized agent.
Any change of label triggers a server event sent to the merchant server.
Example
Let’s use this set of labels:
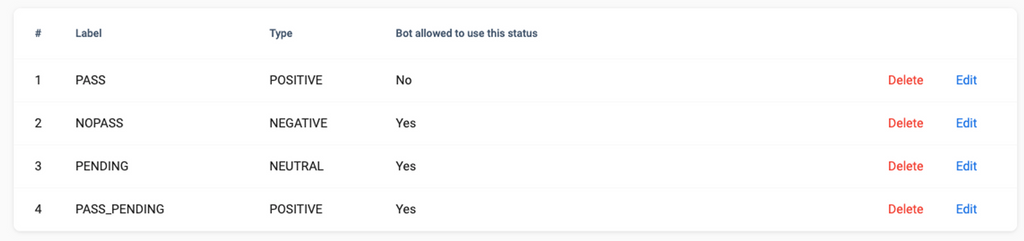
In this example, the algorithm is allowed to set three labels by itself: “NOPASS”, “PENDING” and “PASS_PENDING”. But only a human agent can give the final approbation for the “PASS” label.
Integration example
The integration of Go!Vid is easy as you only need to implement one API call to generate a session link, and then listen for session status changes. When the label of the session is updated, you can update your customer access to your services.
Note: The label can be updated automatically by the robot, or after some delay it can be updated by a human agent, see previous section about labels.
Note: To determine if a customer session was successful or not, the session final label should be used preferably over the score itself.
You can read our technical documentation here: https://algoreg.com/api/3.7/index.html#create-an-onboarding-session
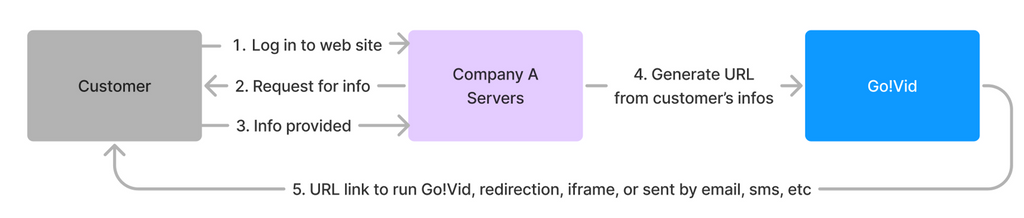
Onboarding link generation
To generate an onboarding link, you must first define an onboarding scenario and its several translations. Then for each new customer to onboard, you will request an onboarding link using our dedicated endpoint.
Depending on the onboarding scenario, you must provide the customer information for the link generation. This information includes: first name, last name, birth date, nationality, address, and phone number. You can also add additional custom data.
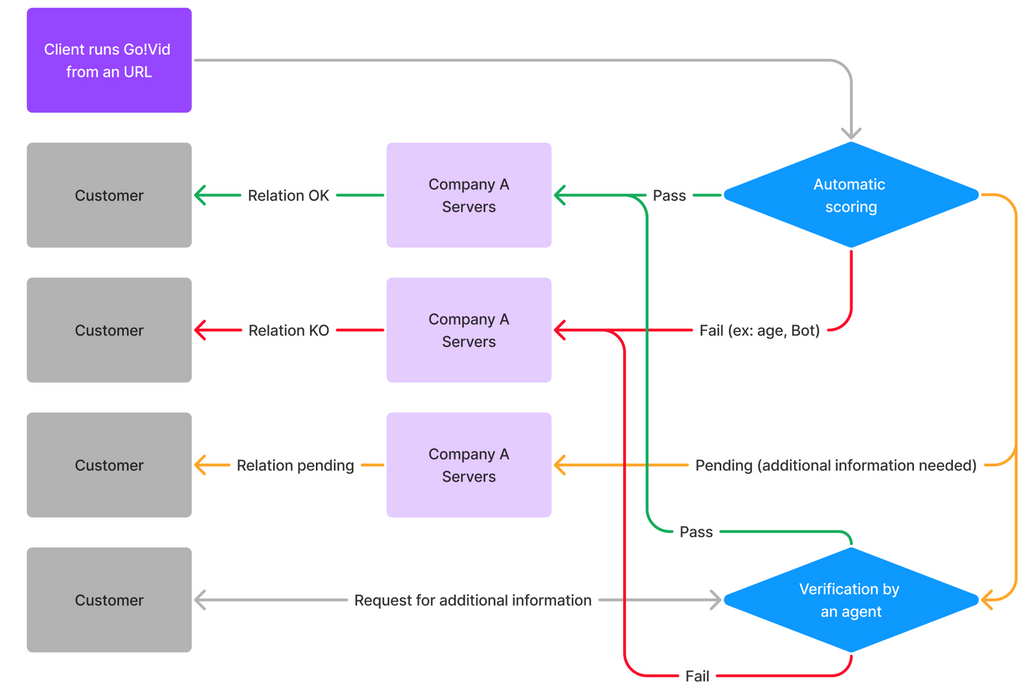
Label change web-hooks flux
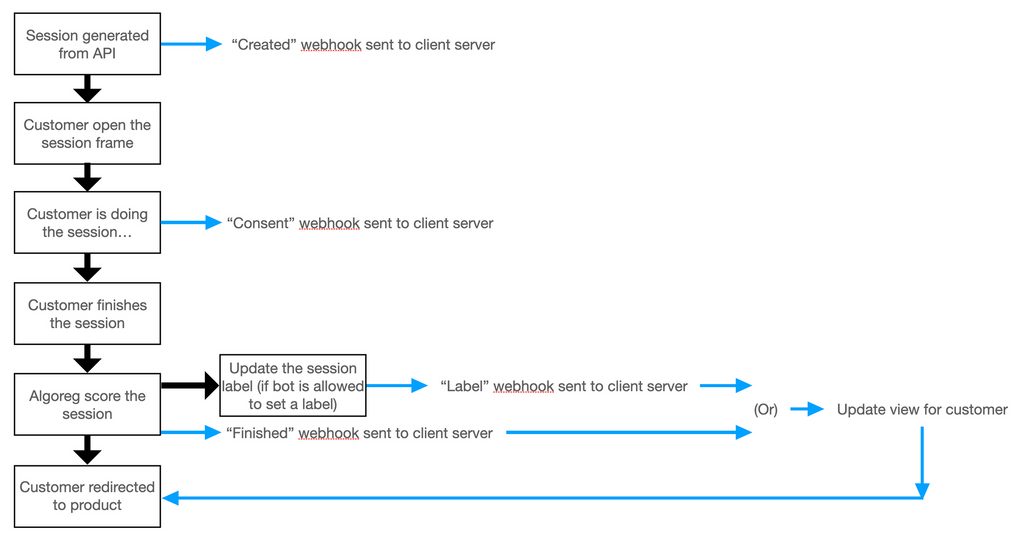
In this schema, we emphasis that the label change can come from an automatic scoring or a human verification depending on your setup. As described in the labels section, multiple labels can be defined for each of the categories “POSITIVE”, “NEUTRAL” and “NEGATIVE” (here represented by “Pass”, “Pending” and “Fail”).
Next articles
Still need help?
Contact us